Monday 5 August 2013

Sad laser

Pro tip: Never accidentally run your laser without first turning on the water pump.


There was a loud crackling noise and now nothing.

Stay tuned for our next exciting installment where I attempt to source, fit and align a new laser tube.

It's only a 40W invisible laser beam triggered by 20kV and surrounded by water, WCPGW?

Friday 2 August 2013

Slicing

There are several 3D printers built from mainly lasercut parts. I've looked at the printrbot-LC and the Prusa-i3/Graber-i3.


Unfortunately, they all have parts too large for my small laser cutter. Without modifying the mechanism, I can only reliably cut about 30x20cm. All of the designs also need 6mm thickness material, which I haven't tried cutting.

So, I'm experimenting with building the large parts in two 3mm layers with each layer sliced at different points.


So far, so good...


Thursday 1 August 2013

Storage

I have a lot of junk.
Having more storage for all my bits and pieces is useful, so I cut out and assembled some of these open top boxes. Originally, they were meant for 5mm MDF, so I scaled the design for the 3mm plywood I have.


Very useful.

Accuracy test

The DC-K40III is mechanically sound. But, the controller board and software aren't. Once I had Moshidraw working, one of the first tests I did was to cut out the spirograph business card to check whether the scaling was right.


Not bad at all.

Nexus 4 Charging Dock mk.1

To charge my Nexus 4 mobile phone while sitting on my desk, I designed a simple dock.
The USB cable is embedded inside it and held in place with a little glue.

http://www.thingiverse.com/thing:126459


It works, but the design isn't quite right. The notification LED on the phone is obscured by the base and it could do with being a bit bigger for stability. Next time, I may try to angle the phone a bit as well.

But, this is the magic of rapid prototyping!

Ratchet rattle/gragger

Here's my design for a spinning rattle, a bit like a traditional football rattle or a gragger.

http://www.thingiverse.com/thing:33910


To assemble it, you'll need some glue and a rod, I used a small section from a bamboo cane.

Warning - this thing is noisy and really irritating - it was banned from the house within minutes.

Othello (aka Reversi) mk. 1

Othello is a game I've liked for a long time. In the game, there's an 8x8 board and 64 pieces. Each piece is white on one side and black on the other.

Here's a design I made for a simple board and some pieces, etched on one side, plain on the other.

http://www.thingiverse.com/thing:124002


My first attempt at cutting a set of pieces worked, but I'm not satisfied.
I'm seeing two problems:

  • The laser is firing slightly late when starting an arc path (hence the unetched gaps)
  • The (old) air compressor wasn't working well and allowed some pieces to get scorched (this should now be fixed)

A toy cart

I was curious to see if I could build a working laser cut toy cart without needing any glue, screws or other materials.

The square axle works surprisingly well and pushes to fit with the wheel.


Better air assist

My lashed up air assist stopped fires, but wasn't very good.
I still got bad scorch marks on cut edges and the tyre inflator air compressor was very noisy.

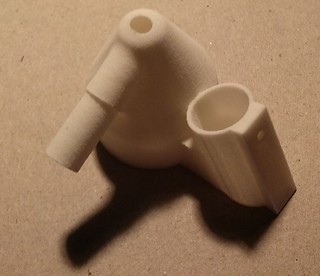
What I needed was a better way to direct air at the cut. I found another user of the DC-K40III, who gave me a design for a 3D printable nozzle. The STL file is here.


Using 
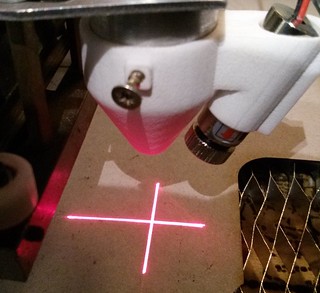
Shapeways, I ordered a 3D print (cost ~20UKP, took under a week to deliver) and got back this:


It's now fitted to the laser head along with a small visible laser showing a crosshair.


I replaced the noisy tyre compressor with a cheap airbrushing compressor (AS18-2 from eBay).

Now, I get very little soot left on cuts and I can hear myself think.